Tweet
| Navigation |
| Home |
| Site map |
| Articles |
| Contact |
| Links |
| Forum |


Simple, cheap panelised dome - anyone can buildI finally seem to have cracked the big problems and have ended up with a design that:
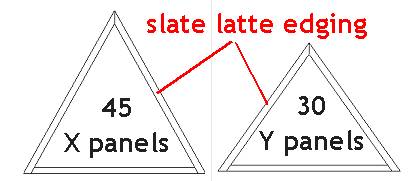
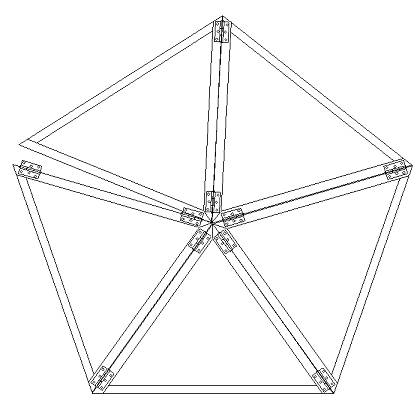
OK so hereís how to do it: Materials youíll need: Slate lattes 8X4 sheets of 6mm ply Cheap hinges Screws PVA wood glue Large bucket of sawdust Glass fibre fleece Wood primer Ė oil based Tools youíll need: Hand saw or electric jigsaw Electric screwdriver Pencil Paint brushes Hammer Bucket How to do it: Start with the dome calculator to work out the panel sizes youíll need for the diameter of dome you want to build. Remember to work out what sizes work best within the confines of an 8X4 sheet of ply. If your building a 3v dome there are only two different shaped triangle panels; mark and cut out all 75 panels, see diagram below:  When youíre done batten the edges with slate latte, this is pressure treated 25mm X 50mm timber. It doesnít really matter which way you put the batten on but if your using 50mm polystyrene as insulation youíll need to put the batten on itíd edge so itís deep enough to fit the insulation inside. OK now your ready to assemble the dome. Take the hinges and put two on each side of a panel, see diagram below:  You will notice that as you pull the pentagon and hexagon panels together a gap forms on the outside, see diagram:  This is where the sawdust comes in: Take the sawdust and mix it with the PVA glue until you get a very thick sticky paste, you want to get as much sawdust as possible mixed with the glue without making it dry. Pack the mixture into the gap as firmly as possible, then level off and leave to dry. When the filler has dried you can screw or bolt the panels permanently together. You can fill the gaps on all six pentagons panels and the five hexagon panels. Donít do the half hex panels until youíve finished assembling the whole dome structure because the panels need to be able to deform enough to allow the dome to sit flat. When youíve fixed the dome down you can fill the remaining gaps. All that you need to do now is weatherproof the dome. Take the fibreglass fleece and lay it over a fresh coat of wood primer then cover the fleece with another coat of primer, this stops the primer from cracking over the joints and letting water in. I would recommend coating the whole surface with fibreglass and finishing with a gel coat, this will weatherproof the dome for at least 25 years. There you have it, a dome that can be built without any complicated angles or hubs, is weatherproof and incredibly cheap to build. Notes: I didnít include any door openings or riser walls in this tutorial but I will be adding detailed plans to the site showing how to build various domes using this technique. |
|
 |
|
| [ comments 19 ] |
| posted by Colin | 31/05/2007 16:58:06 |
 |
|
| Hi Paul Looks like it should be workable, the only way to be 100% sure is to build one i guess. It may be easier to use simple rigid triangular panels (12mm plywood for example)instead of the framed timber triangles for a small sized test dome. | |
 |
|
| posted by Mike Barnett | 29/06/2007 14:00:44 |
 |
|
| Nice article, but what is slate latte? please excuse my ignorance. Thank you Mike | |
 |
|
| posted by colin | 01/07/2007 18:57:49 |
 |
|
| Hi Mike, They`re pretty much timber battons used on roofs. You would normally nail the tiles/slates to them. | |
 |
|
| posted by Aaron | 24/08/2007 16:23:38 |
 |
|
| Would this be considered a stress skin dome? What about cutting doors or windows in the plywood, could this compromise the dome? Great idea! Has anyone built one of these? | |
 |
|
| posted by Admin | 28/08/2007 00:57:00 |
 |
|
|
Hi Aaron, Yes in this case the skin is stressed because the timber frame around each triangle is thin wood. However if you increasd the size of timbers in the frame this would make it strong enough to be self supporting, you could then use glass instead of ply and make a green house for example. Cutting holes would make little difference to the structural integrity of the dome, if you were worried just increase the size of the timber battens around each triangle. I'm going to build a dome using this technique soon, I'll post a link here when I have something to show. |
|
 |
|
| posted by Colin | 28/08/2007 11:52:12 |
 |
|
| Hi Paul/Aaron, I don`t think glass would work too well as a stressed skin material..it doesn`t bend :) A stressed skin dome relies on the cover materials abilities to conform to the curvature of the spherical surface. If you make the frame thicker and therefore more rigid, you`ve also removed it`s ability to bend as much, so you`d be back to cutting angles. Now you`ve got a framed panel dome instead of a stressed skin dome ;) | |
 |
|
| posted by Ed | 19/03/2008 05:22:13 |
 |
|
| Hi Paul I like this design. But what is Glass fibre fleece? We dont have it in Australia.. Neither do we have lattes.. I'll 2x2 (90*45) structural pine, but what is the fleece? Cheers Ed Cheers Ed | |
 |
|
| posted by freeman | |
 |
|
| a group of us used these plans as a basic outline for a 30 foot wide dome that is 13 feet high. we used 2x4 ripped in half, end plates on each corner of the triangles ,and hinges. It worked out very well with some gaps here and there, but the structure is very solid. Thanks for the info! | |
 |
|
| posted by Andrew | 31/12/2008 09:43:33 |
 |
|
| Love the design. Sounds like just what I'm after. If I was to insulate the panels and heat the dome wouldn't this cause moisture to build up on the inside of the plyboard? Could I put notches at the top and bottom of each triangle's batten to allow ventilation around the internal surface of the ply and then have ventilation holes at the top and bottom? | |
 |
|
| posted by Admin | 31/12/2008 19:22:57 |
 |
|
| I wouldn't worry about moisture build up too much Andrew, but having ventilation notches is a good idea and I would definitely do that. For large domes you could build a inside and outside framework with insulation against the inside frame and a ventilation gap before the outside frame. If the insulation you use is air/water tight then no ventilation is required. More info about ventilation here | |
 |
|
| posted by dennis | 23/02/2010 22:04:10 |
 |
|
| nice articals all. I feel confident now about building an out building for yard and garden equipment. across the pond we're non-metric by that should be easy enough to resolve. thanks again...den | |
 |
|
| posted by Richard in Trinidad | 06/06/2010 16:52:14 |
 |
|
| I have always considered myself brilliant but hats off to you! Now I know how I am going to build my dream house. Question I am going with a 30' diameter. Should I use 2X4 or 2X6 lumber? (Obviously I am gree to all this) | |
 |
|
| posted by RG | 11/06/2010 19:54:45 |
 |
|
| do you have a design for a riser and a door opening? | |
 |
|
| posted by Randall Burns | 15/06/2010 06:07:55 |
 |
|
| This framework might also be used for semi-portable structures by substituting bolts for some of hinges. | |
 |
|
| posted by Fredrik Grahn | 01/03/2011 20:18:07 |
 |
|
| Ingenious!!! This will probably be the basis for the dome I am wanting to build! Thank you soo much! | |
 |
|
| posted by IVS | 21/02/2012 19:38:53 |
 |
|
| Very smart idea about those hinges and gluing and bolting afterwards! Am I getting it right that after having assembled the hexes and pents and those halves you suggest we use hinges again to join hexes, pents and halves to complete the dome and after the structure is joint and settled down we proceed to glue and bolts? | |
 |
|
comments will be accessed through the forum in the new site design (coming soon)
16431
Copyright © 2007- 2014 geo-dome.co.uk. All Rights Reserved.