Tweet
| Navigation |
| Home |
| Site map |
| Articles |
| Contact |
| Links |
| Forum |


How I built my stressed skin geodesic domeI had built a Paper model to test out my design, which was a 3v dome with a small opening top centre for ventilation and five dome skylights. I was amazed at how strong the paper model was so I decided to build the full size dome in exactly the same way only using 16-gauge aluminium sheet instead of paper. The drawings: 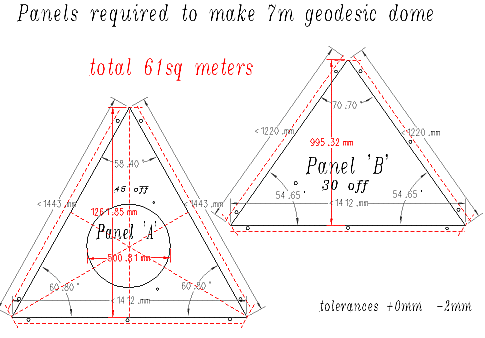 I made two patterns, (there are only two different shaped panels required to build a 3v geodesic dome) a local metal fabricator cut the panels from sheet aluminium, cut three slots in each side for bolting together and bent back the tabs. I had to cut a hole in 5 panels to fit the dome skylights and join all the panels into pentagons, hexagons and half hexagons just like the paper dome. 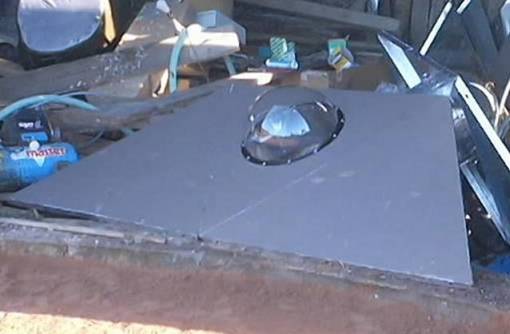 Next I waited for a nice calm day, the panels felt really delicate so I got a friend to give a hand on the Sunday – We would have to get the dome built in a day because I didn’t think it would be safe to leave it overnight.  Half way through the construction, all was going together as planed but the structure felt unstable, we had to prop the hexagons using brushes because they would bend under there own weight, the whole structure was like jelly. If a strong breeze got up it would have ripped the structure apart, boy did I get that sinking feeling. It took about 5 hours on Sunday to complete the dome, when we put the last pentagon in the top the whole structure became rock solid. The next day I climbed through the ventilation hole on top of the dome, it was amazing Sheet aluminium less than 2mm thick, holding a 13 stone man over a clear span of 7 meters! 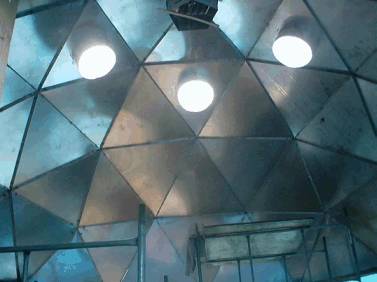 It took 3500 rivets and two weeks work to put the cover strips on but it made the dome even stronger. I under coated the bare aluminium with special aluminium primer then put a resin coating over the whole dome using fibreglass tissue on the joints to bind the resin. The finished dome: 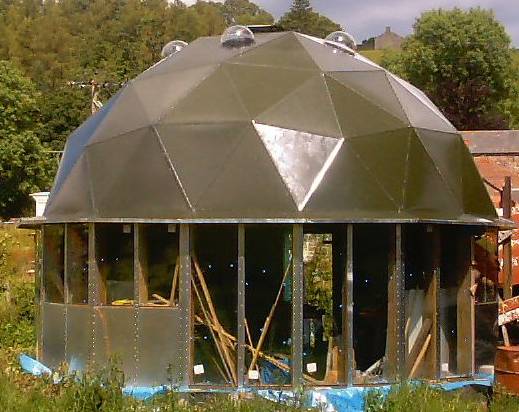 I added the rim at the base of the dome to stop rain running down the windows, I also thought that it looked better. |
|
 |
|
| [ comments 8 ] |
| posted by Jeremy | 11/11/2006 00:17:02 |
 |
|
| Awesome. Congratulations. | |
 |
|
| posted by bigegg | 14/02/2007 14:17:06 |
 |
|
| What sort of budget did you have for this? (How much did it cost? :.) ) | |
 |
|
| posted by Richard Fisher | 02/12/2008 12:14:32 |
 |
|
| Great job! No struts? Where are the rivets? Looking forward to mine! | |
 |
|
| posted by Rick Miller | 09/03/2009 18:58:30 |
 |
|
| Could you put up a larger image of the panels with measurements? This one is hard to read. | |
 |
|
| posted by Tareq Ghazal | 15/04/2009 11:32:35 |
 |
|
| This is amazing. How much did it cost, how much space inside, how is the heat inside during summer and winter since you are using aluminum panels. | |
 |
|
| posted by Donneperth | 24/11/2009 02:44:52 |
 |
|
| An amazing effort. Beautiful dome! Did you use UV stable polyester resin for the coating or another type? Can you give costings? @Rick: Copy the panel image into word. Enlarge the image and print out. I have been buying coolroom foam core and aluminum panels as a possible building material: strong and lightweight and insulative. Sometimes they strip the ally off and sell it as scrap. May be a cheap source for ally sheet. Filling the panels with papercrete will also insulate if you need insulation. | |
 |
|
| posted by Mr. Majer | 24/11/2010 20:58:47 |
 |
|
| The following information is a public announcement: This AWESOME and it's really helpful. LOVE THIS WEBSITE! I only wish that I could get to build this. But I can't because I don't have the tools and the time. But this is just awesome! | |
 |
|
comments will be accessed through the forum in the new site design (coming soon)
9139
Copyright © 2007- 2014 geo-dome.co.uk. All Rights Reserved.